Palm Sunday
Your step by step to recreate this Palm Sunday Bible Journaling entry…

What we used to create this journaling entry
and links to where you can get some of it!
- A Palm leaf stamp from this leaf stamps set:
Etsy shop (This link is for the Etsy shop as the listing wasn’t available anymore at the time). - Clear Stamp base
We used one from The Range - Watercolour paints
We used various greens and blues- you can get watercolour sets in many shops or online. - Masking Fluid
We used this one from Amazon - A small sponge
We have some natural sponge but most types will do. - Black brush pen
We used the Zig Clean Color Real Brush Marker Pen 010 Black this time but you can use any brush pen. We find people prefer different types! - Black Ink Pad
We like the versafine stamp and today we used the colour onyx black. These stamps are also used for embossing. - Black fineliner pen
We like the Sakura Pigma Micron Fineliner pen in black. - Alphabet stamps
We have a couple of different sets including a small one from Hobbycraft. - Clear Gesso
We use the ‘Liquitex Professional Clear Gesso Surface Prep Medium’ which is available from Amazon.
Step by step
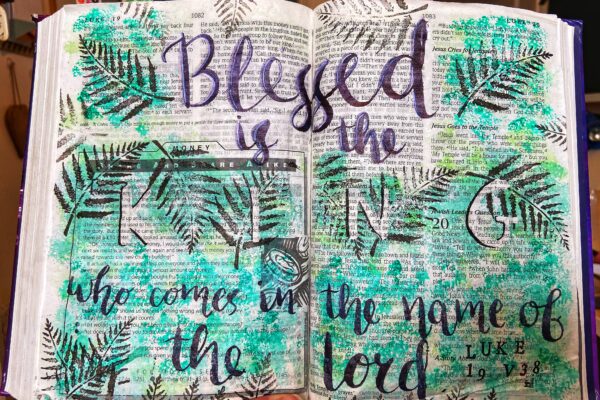
- GESSO
Depending on whether you are using a journaling bible/regular bible or journaling book you may or may not need to do this step.
If you’re using a regular bible, because the pages are particularly thin we recommend using gesso as a base to strengthen the page. Gesso can be clear or white- we have used clear today so we can still see the scripture behind the art work. Simply paint the gesso over the entire two pages and leave to dry completely. It will feel slightly rough to touch when dry. - MASKING FLUID
Mark or mentally decide where the KING letters are going to be over your pages then paint them using the masking fluid. Be generous with it, and leave this to dry completely. - BRUSH LETTERING
We then wrote the rest of the verse with a black brush pen using a brush lettering technique. If this is something you haven’t done before or aren’t confident doing freehand, do some practices beforehand to get the shape and sizing as you want it. - WATERCOLOURS
Mix together the green and blue tone colours you would like as your background. Use the sponge, load it up and dab on your page. Make sure to go over the KING masking fluid section to give a more defined letter later on. Leave to dry. - PALM LEAF STAMP
Peeling the sticky back off the stamp attach it to the stamp base then dab the ink pad over the leaf. We started stamping over the KING letter creating points like a crown. We then filled the rest of the page with palm leaf prints where we felt it needed it. You could choose to overlap some or press part of the stamp over the edge of the page. Play around with it! - SCRIPTURE STAMP
We left a space in the bottom right corner to add the scripture reference. If you like you could also add the date in which you created this journaling entry. Use the Alphabet stamps and the black ink pad. - MASKING FLUID PEEL
Using a rubber eraser or your finger, gently rub at the masking fluid and you should be able to peel it off. It should have a similar texture to dry PVA glue. Once you peel this off it should reveal the KING letters with no watercolour or ink on. - KING DEFINITION
Finally using a fine liner, define the left side of the letters giving it a drop shadow effect and making the KING letters pop a bit more on the page.
WELL DONE, you have now completed your Palm Sunday bible journaling entry!
FREE COLOURING SHEETS
Click on the image to download your FREE colouring sheets.


If you liked this blogpost and are interested for more, there are a number of ways you can connect with us. We have a Facebook bible journaling group which you would be welcome to join by clicking the button below:
Or why not sign up to our newsletter and select the ‘Bible Journaling’ interest so we can send you inspiration right to your mailbox!
Or book onto future events including online bible journaling workshops:
No comments to show.